Simple application server with Node and Raspberry
This open source software, offered by Google and available on GitHub, greatly facilitates the creation of a local server or the Internet. It is described by the authors as "An easy way to perform web tricks on a Raspberry Pi."
Google Coder is a version of Raspbian that comes preinstalled with Node, as well as a server script and web interface for the client.
To install it and create an application server, you need the following:
- Raspberry Pi Model B for network connectivity. You can also use Pi Zero with the Ethernet expansion card.
- OS image: This is the raspi.img file that comes from uploading the coder.zip to the site (link below) and extracting the content .
- SD or micro SD card depending on Pi model. You must format it in FAT32. If the system does not allow this, load the SD Formatter.
- You can then burn the image to SD. The same software used for Raspbian and listed on the Raspberry website can be used here: Windows Win32DiskImager available on Sourceforge. For other systems, see the Raspberry Site Installation Guide .
For electronic mounts, an interface to the hardware is also required, for example:
- Raspi-io. Plugin to adapt Johnny the Five to Pi.
Start-up
After the SD card is engraved, just insert it into the Pi, connect it to the Internet and connect to it. The client computer must also be connected to the Internet.
You are prompted for your username and password. But it is not necessary to log yourself into the server so that it is available to clients. If you want to access the server directly, enter pi for the login and the password that you give from the client interface .
Regardless of your system, Linux, Windows, Mac, Android, you can directly log into Pi from your browser .
If you have Linux or MacOS installed, enter your browser URL:
http://coder.local/In Windows, enter the IP that appears on the server immediately before the login (IP depends on your hardware).
http://192.168.xxx.xxxPut the URL in your favorites and you never have to look for this IP again! You can also enter IP on Linux or Mac. You can also associate a domain with this IP using DNS.
A warning message should appear that the site is not secure and you will be prompted to return so quickly. This is provided and Google asks you to ignore the warning. Click the link at the bottom of the page to continue to the site.
You now have access to the interface, which is a web page sent by Pi, whether in the same room or anywhere in the world. This interface allows you to select an application or write and add your own application.
Server Access
When the client interface appears, you are prompted to create a password to log in. This password is also used to access the server on the Pi. Access to the server is not required to create an application, except for adding programs and modules .
If the keyboard is of the AZERTY type, then it is better to choose letters that have the same position as on the QWERTY keyboard, since it is the latter that recognizes Pi. In particular, avoid the letters A and M. You should also type an image from the QWERTY keyboard to see a match .
So, you gain access to the server-side system by entering pi for the client login and password. But then you need to immediately configure the system for your language (usually French), and the keyboard. Type sudo raspi-config or, more precisely, AZERTY rqspi) config on the keyboard to access the configuration program. Then go to internationalization and make a choice of language, and then press the keyboard and follow the sequential steps. You must reboot your system for the changes to be effective.
Interface
An interface is a group of colored tiles, each corresponding to an application. In fact, this repeats the idea of Tiloid, with additional online access. Tiloid uses Node in the backend and is a free alternative to Modern UI Windows 8. The coder further improves this idea. This is, among other things, an analogue of the Raspberry for the Arduino IDE .
Click a tile to launch the app or a green tile with a "+" sign to add a new app. The code is spread over several tabs, as shown in the screenshots below:

Client code: Writing interface page with HTML, CSS and JavaScript
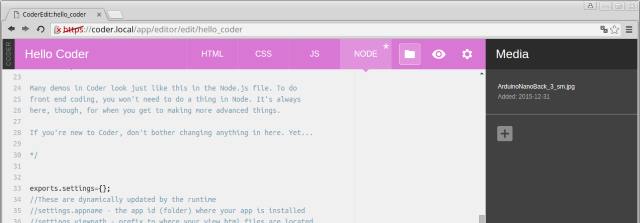
Server ID - You can send images to the server using the Media interface
Thus, the application runs completely remotely and is hosted by Coder. By completely removing access to the server for the programmer, Coder makes installation as easy as possible. This allows you to implement the application on a desktop computer and use it on a mobile computer to perform home management or performance tasks. It is even possible to use robots, since you can develop server code using the Node tab. No more sumo with sudos and all these endless commands.
How to add an app
One of the interface tiles with a "+" as the name serves as the starting point for the application.
It starts with creating a new tile: they give it a name and choose a color. Then click New. The selected name appears in the menu bar with different tabs. The continuation is obvious if you have HTML concepts: create a page, CSS and JavaScript code. However, the method of linking elements together and adding images is special here.
To add an image, click the icon representing the folder and select the file. The Media window opens with a list of added items. The following tag is added to the code:
<img src="" />First, select the image if there are several of them, and then in the HTML code place the cursor between two quotes, return to the Media window and click the "Paste to code" button. The URL will be added to the previous line:
<img src="/static/apps/mon_application/media/image.jpg" />"mon_application" is created by Coder with the name you selected, in our example it is "My Application ."
CSS code, JavaScript scripts, images are automatically linked through the interface, you do not need to include the file in the HTML code .
Resources and Information
- Coder. The official website of the project .
- Source code on GitHub.
- Examples of creating applications.