Raspberry Pi Zero, Arduino alternative
While the creators of Arduino are fighting to own the corporate name, Broadcom is revolutionizing the microcontroller area with Pi Zero, a motherboard that has the capabilities of a computer, as well as 40 GPIOs for direct ordering of electronic devices. This is the fifth price of Arduino Uno!
However, Pi Zero has more features than the 2000 desktop. As with the Gateway Select 1000, one of the first to receive a 1 GHz processor...
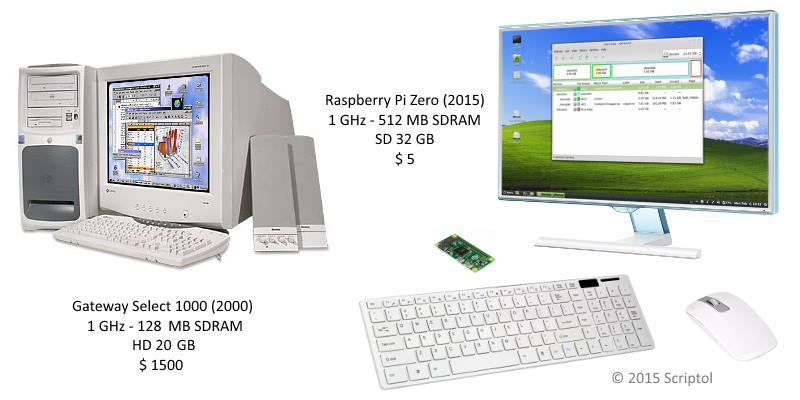
Zero is likely to be used not as a desktop computer, but as a robotic controller or for the home. Therefore, it is worth comparing it with the most popular product in this area - Arduino Uno.
Pi Zero vs Arduino Uno comparison
:| Arduino Uno R3 | Raspberry Pi Zero | |
| Price | 25 € | 5 € |
| Processor | ATmega328P | Brodkom BCM2835 |
| Frequency | 16 MHz | 1GHz (60x faster) |
| Ports | 14 digital, 6 analog | 40 GPIO, all digital |
| List | 32 KB + 2 KB | 512MB (15,000 times more) |
| USB | 1 | 1 OTG + 1 power supply |
| HDMI | No, it isn't | Yes I did |
| Sizes | 68.6 x 53.4 x 10.6 mm | 65 x 30 x 5 mm |
| Input voltage | The 7-12th | 5v |
| Output voltage | 3.3v or 5v | 3.3v |
| Consumption | 20-50 mA | 60-500 mA. |
Pi does not have analog ports such as Uno, but analog components can be connected to them if they have a I2c or SDI interface. You can also add an ADC (Analog to Digital Converter) expansion card.
You can also reduce consumption, as explained below.
Setting the environment
Let's start by installing the operating system, Raspbian or Linux IoT. As explained on the raspberry.org website, the system is copied to the SD card and it is ready to start as soon as the SD card is inserted into the zero slot.
Node.js will then be installed to have a JavaScript interpreter. All 10 megabytes of the package will easily fit into 512 MB of Zero memory!
If you want to use Zero as a controller, the first thing to do is to reduce consumption, especially if it has to work with the stack. You can split it in half and raise it to the Arduino level, in sleep mode, turning off components unnecessary for the controller: a retroreflector, an HDMI connector.
Disable HDMI: in/etc/rc.local, add this line:
/usr/bin/tvservice -oOh, takeaways. We would bet if we wanted to activate it.
Turn off the indicator light: in/boot/set.txt add these two lines:
dtparam=act_led_trigger=none
dtparam=act_led_activelow=on
Expansions
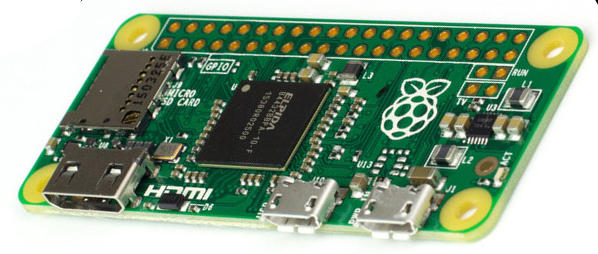
As you can see in the image below, zero has an SDXC slot, HDMI output, two USB micro-B OTG and 40 GPIO. There is no Ethernet outlet, so you will have to communicate with the device differently.
To connect Zero to the outside world, you may need the following components:
- Mini-HDMI to HDMI adapters or mini-HDMI cable. USB micro-B to A adapter.
- GPIO header 2x20 so that sheets and riders can be inserted, as was the case in the Arduino experiments.
- Dongle Wi-Fi to send commands to zero. This can also be done using USB or GPIO.
- Ethernet-USB adapter. To replace the Ethernet connector if you want to create a local network or even go online. They can be found for €10 on Amazon .
- An ADC pinch board to convert similar signals to digital if necessary. It costs about €15.
In our experiments, we rarely used an analogue to connect with a potentiometer or gyroscope. Both can be digital.
The Arduino starter kit will help you find the necessary components for electronic experiments or a list of components.
Resources