To create a Silverlight project using a Blend expression
The Expression Blend development tool simplifies the creation of Silverlight applications.
Expression Blend is a development tool for WPF and XAML that allows you to create software and web applications. The "Tools XAML" list shows how to get the software.
Create a new project
- In
- File menu select New Project...
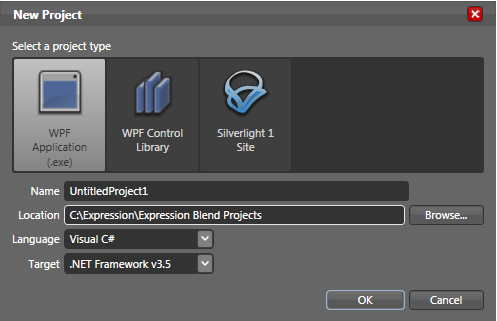
The following dialog box appears. In - In the dialog box, click the WPF image to create an executable (.exe), or in the WPF Control Library to create a program-related function library. In the
- Name field below, enter a name for the new project.
- You also have a list of programming languages to choose from, select a language (C # or Visual Basic).
- Then click OK.
 .
.
Create a new document
After you create a project, you can add components. Note that a window has already been created in the Windows1 file and creating a window is useless.
- In
- File menu select New Item and then select the following functions:
WindowAdd a window or dialog box to the project.
PolzovatelControlDefines a graphical component that complements the project user interface.
PageThis page contains code that can be accessed using a file manager, browser, or other program.
Resource dictionaryCreate a resource to be used from other project components.
In - In the Name field, enter a name for the document, or accept the default name.
- Select the Include check box if you want to generate code in the file for the document you created .
Now you are ready to create your first program as a binary application.
First program with Expression Blend
After creating a project, creating the first program using Expression Blend is puzzling.
In the center window on the right there are two side tabs - Design and XAML.
- The design shows a visual mode that places display components whose properties change while
- XAML displays the appropriate source code.
Switch to XAML mode. You can see that the following code was automatically generated with the project:
<Window
	xmlns="http://schemas.microsoft.com/winfx/2006/xaml/presentation"
	xmlns:x="http://schemas.microsoft.com/winfx/2006/xaml"
	x:Class="UntitledProject1.Window1"
	x:Name="Window"
	Title="Window1"
	Width="640" Height="480">
 <Grid x:Name="LayoutRoot"/>
</Windows>
If you have already read the chapter "The first XAML program" (this is not necessary), then you will notice that here the interface is a window (Windows), and not a canvas (Canvas), as is the case with a web page.
In addition, an empty Grid tag was created, which should include the content:
<Grid x:Name="LayoutRoot"/>
It is in this tag that the code will be placed, so you need to open it:
<Grid x:Name="LayoutRoot">

</Grid>
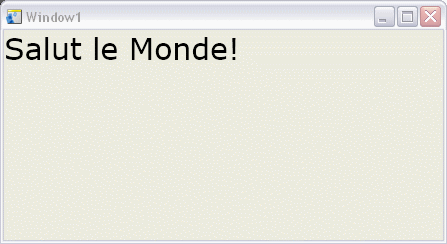
Consider the code we used in the previous chapter and put it in a container:
<Grid x:Name="LayoutRoot">
  <TextBlock
    FontFamily="Verdana"
    FontSize="30" >
     Salut le Monde!
  <TextBlock>
</Grid>
The Ctrl and S keys control the syntax of the code.
Our first program is over!
It remains to compose it. Open the Project menu and click Build Project. Make sure there is no error message in the lower window.
If the following message appears, everything will be perfect:
Build completed
To start our program, click on the last line of the same menu: Test Solution or press F5.
We should get the following window:
The executable binary program (.exe) is located in the bin\Debug subdirectory of the project directory.
Go to C Sharp
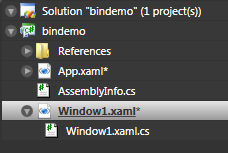
When you create an XAML project with Expression Blend, a linked C # file is created. To see it, click the icon to the left of the XAML file name.
You must at least install Visual Studio Express to access C Sharp code. To load the code editor, click Windows1.xaml.cs.
There will be a space name, which is the name of the project, if this is the space of your application. It also contains a Windows type class, this is the main window of your application .