SQL Tutorial - First PHP and MySQL Program
In this example, we will create a program that fully supports the minimalist demo database.
Then we'll go:
- System initialization.
- Create a new database.
- Create a table in this database.
- Add Articles.
- Read the article.
- Delete article.
- Close the connection.
System initialization
On mutual server
The administration interface allows you to automatically create a database. You are provided with the following information:
Nom du serveur: quelque chose comme mysql-5-1
Nom de la base de donnée: nom choisi par vous.
Nom d'utilisateur: même nom que la base de donnée.
Mot de passe utilisateur et base de données.
And to connect to the server, the command will be used in the form:
$connexion = mysqli_connect('mysql5-1', 'user', 'pass', 'base')the first parameter is the server name.
Locally in the command
line:Enter the mysql/bin directory (which may be contained on the local server).
mysqld-nt -u user -h server -p nameOr a similar executable supplied in your configuration.
Withlocal server (XAMPP, Easyphp)
Just log in as root.
$connexion = mysqli_connect('localhost', 'root');This user does not need a password.
The connection allows you to prepare for the creation of a database and is mandatory for any operation on this database.
For a user other than root, you will need to specify a password, after which the command will take the form with the local server:
$connexion = mysqli_connect('localhost', 'root', 'passe');Creating a database
PHP uses the mysql_query function to send a CREATE DATABASE command to the server followed by the database name.
So, with a command like this:
$command = 'CREATE DATABASE mabase';
$results = mysqli_query($connexion, $command);
The $ connection variable is assigned by the command of the previous paragraph of the database connection .
Running phpMyAdmin in the local server menu or in the hosting administration panel should now have the name mabase in the list of databases .
Other databases that have already been created by the system can be ignored.
Selecting a database
Since the server can offer multiple databases, use after connecting to the server requires a database selection, which is done with this command:
mysqli_select_db($connexion, 'mabase'); The last open base will be used by default.
Creating a Table
We want to run a real estate agency, and therefore we have a list of apartments, in different cities, and for each owner and address, as well as unchanged value.
A list of lines, these are apartments and in the columns we will put data for each: code, name, address, value .
| Apartment | Name | City | Value |
|---|---|---|---|
| 1 | Paltrow | Hollywood | 12.000 |
| 2 | Thurman | Los Angeles | 34.000 |
| 3 | Johansson | Miami | 28.000 |
A new table is created using the SQL CREATE TABLE command, which has column names (in the case of apartment, name, city, value) as a parameter, followed by the data format.
When in the format, we will use an integer for the apartment number, and for the cost. For names and cities, fixed-size strings would make access faster, while variable-size text would be used for an article such as a blog post.
Let's define the apartment code as the primary key.
This gives the following SQL command for the table at home:
CREATE TABLE maisons (appartement INTEGER(3),  nom CHAR(30),
     ville CHAR(50),  valeur INTEGER(9), PRIMARY KEY(appartement))
The type definition contains the maximum number of characters or numbers in parentheses. Therefore, a string of no more than 30 characters is written CHAR (30).
To pass this command to PHP, the mysql_query function is used again:
$command="CREATE TABLE( etc...)";
$result = mysqli_query($connexion, $command);
Now launch phpMyAdmin and look into the mabase database.
In the menu on the left under the name of the bases, houses appear, click them to see the details of the fields:
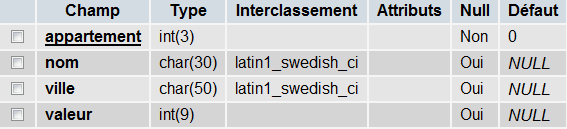
Note that the primary key is underlined and that this field cannot be null because it is a primary key.
Insert Items into Table
Use SQL INSERT INTO to add rows to a table. The format is as follows:
INSERT INTO nomtable(...liste colonnes...) VALUES(...liste valeurs...)Values correspond to columns.
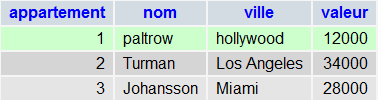
For our example, the first row of the table can be added using the command:
INSERT INTO maisons(appartement, nom, ville, valeur)
     VALUES(1, 'Paltrow', 'Hollywood', 12000)
Note that text fields are enclosed in quotation marks, as opposed to numbers.
After adding all three rows, return to phpMyAdmin, click the table name and click the view. Look down, you should have this spreadsheet:
Read the content of the article in the database
The SELECT command is the most advanced feature in SQL, but only the most basic feature will be used in this introductory chapter. To read the field in the table, we give a condition, for example, the apartment number. We could explore other fields, of course.
SELECT * FROM nomtable WHERE conditionThe mysql_query command in this case returns the resource number, while it returns true when the operation succeeds otherwise. If the query fails, it returns false in all cases.
The PHP code will look like this:
$command="SELECT * FROM maisons WHERE appartement = 2";
$result = mysqli_query($connexion, $command);
Then, to restore the string using the PHP mysql_fetch_row function, which returns an array, you must use the resource number assigned to $ resut:
mysqli_fetch_row($results)The operation must show the contents of the table corresponding to the second row of the table.
Delete Part
This is done with a condition similar to the reading condition and with the DELETE command:
DELETE FROM nomtable WHERE conditionIN PHP:
$command = "DELETE FROM maisons WHERE appartement = 3";
mysqli_query($connexion, $command);
Check with phpMyAdmin and the show command that the third line has been deleted.
Close the connection
This happens automatically at the end of the script or when you call the mysql_close function:
mysqli_close($connexion);Conclusion
To use SQL with PHP, we used the following functions:
- mysqli_connect: connecting .
- mysqli_select_db: select base .
- mysqli_query: placing an order .
- mysqli_fetch_row-Retrieves a row from the table by resource number.
- mysqli_error: know messages about possible errors.
- mysqli_close: close connection .
The rest is in the syntax of the SQL language.
Program sources
Change the extension to PHP to run scripts or load SQL sources in PHP/MySQL.