Resynthesizer tutorial
Download and unzip Windows or tar.gz other systems.
The readme file contains a description of the commands, which is too brief, so this tutorial.
Installing for Linux
Copy files to:
~/.gimp-2.8/plug-ins/
Installation for Windows
:For version 2, let's build a binary file with the C++ compiler.
Copy files to:
c:\Users\username\gimp-2.8\plug-ins\
If you cannot compile the plugin, you can use the previous version, which is equipped with an installer. Download and extract the archive, run the executable and replace 2.6 with 2.8 using the suggested path.
Commands for using the resynthesizer
A new command will appear in the "Script-fu" menu: Enhance (improved).
It contains three options:
Smart binding
Creates a new image from the selection.
Delete Selected Object
Removes the object framed by the selection tool and restores the fill based on what surrounds the object. Specifies the length of the radius (radius).
You cannot select a sample, it is also better to use the filter described below.
In Windows, the script has an error and repeats the upper left corner of the image, and not what is around. There is a patch for Gimp.org.
Smart sharpen
Makes sharper.
To use a synthesizer, select part of the image and click one of these options.
Resynthesizer filter
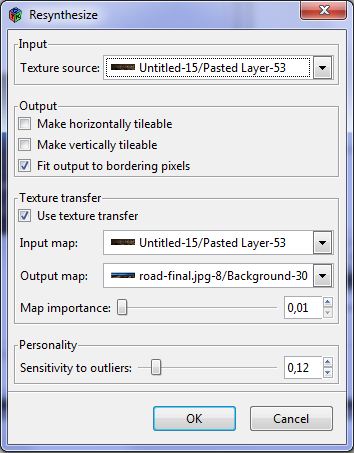
It is located in the menu:
Filter -> Map -> Resynthesize...
It allows you to create a texture that can be used as a brick, or delete an object, as the Intelligent Deselect command does.
But it also allows you to choose a source as a sample.
Parameters:
Horizontal/vertical suitability
Change the image to create a brick that can be used as a texture.
Clear the check box if you want to delete an object in the image.
Exit to pixel boundaries
Since the object to be deleted is determined by the selected object, the plugin ensures that the edges of the texture match what is around
Texture transfer
Specify two images that will guide the placement of the texture in the destination image.
The plugin will search the source texture for pixels of the same colors in the input image and the output image.
The input image must have the same mode and size as the image used as the texture.
The output image must be the same mode and size as the image you want to change. Most often, the most common picture itself is used.
Important menu
Use the slider to determine how important these two carry images are.
Sensitivity to outliers
Sensitivity to extreme values. Perhaps you want to smooth out the differences or take them into account.
Let's move on to practice, step by step, with images obtained at each stage.
Compile plugin?
Vorrid
![]()
Have you lost your mind? Most people I know don't know what a compiler is... And even more so they used one. Would you tell Photoshop users to compile plugins? No, because you know this software is for ordinary people. Is GIMP for your tier?
Webmaster
![]()
A new version of Gimp has appeared, which you apparently use and which made the plugin incompatible. Someone took responsibility for the development of the latter, but did not want to provide binaries. Therefore, you need to recompile the source code according to your system.
I would advise you to keep version 2.6 next to 2.8 (it's really no worse) to be able to use the original plugin, which works perfectly.