Switch: Potentiometer
Along with digital ports, Arduino also has 6 ports that can be used as analog inputs. These inputs receive a current (0 to 5 volts) and convert it to a digital number from 0 (0 volts) to 1023 (5 volts) (10 bits resolution). A very useful device that exploits these inputs is a potentiometer (also called variable resistance). When connected at 5 volts through external ports, the middle port reads some values from 0 to 5 volts depending on the angle at which it rotates (hence 2.5 volts in the middle). We can use the returned values as a variable in our program.
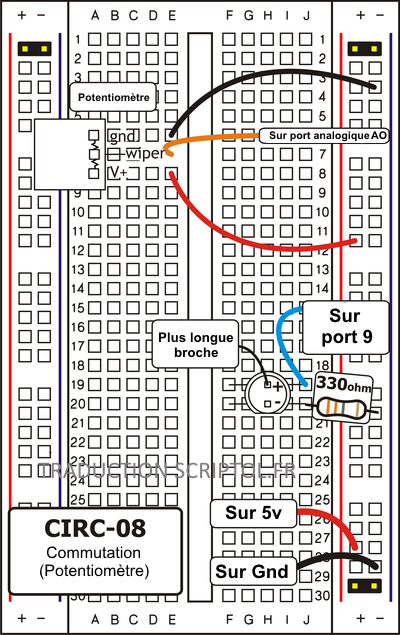
Translator's note: There are some errors in this exercise that have been corrected in translation, as the original is probably based on an old Arduino card. There is no analog port 2 on the Arduino Uno, but A0 ports are A5. Since the code addresses port A0, I replaced 0 in the English scheme with A0 in the French scheme and 2 in the English text with A0 in the French text (double corrected error). The diagram mentions digital port 13, while the code uses 9, again, you need to follow the code.
SHARES
- 10kOhm potentiometer.
- 5 mm LED.
- Resistance 330 ohms (orange-orange-brown).
- Connecting wire.
CIRCUIT DIAGRAM
CIRCUIT INSTALLATION

NdT: Replace pine 13 with 9 and pine 2 with A0.

Installation by translator. The perspective effect creates an offset but connects port 9.
CODE
You can find this code in CIRC-08-code-pot.js.
var five = require("johnny-five"), board, myPotentiometer;

board = new five.Board();
board.on("ready", function() {
  myPotentiometer = new five.Sensor({
    pin: "A0",
    freq: 250
  });
  myLed = new five.Led(9);
  myPotentiometer.on("read", function() {
    var rawValue = this.raw;
    myLed.brightness(Math.floor(rawValue / 4));
  });
});
EMERGENCY REPAIR
Works sporadically
Most likely, this is due to the somewhat dubious connection of the potentiometer pins. This can usually be corrected by pushing the potentiometer.
Not working
Make sure you do not connect the potentiometer wire to digital port 0 instead of analog port A0 (a series of ports below the power ports).
Still not working
You can try to remake the chain upside down. Sometimes it helps.
CODE EXTENSION
Switching threshold
:Sometimes it is necessary to switch the output signal when the value exceeds a certain threshold. To do this with the potentiometer, add a variable for the threshold value to your program (for example, var threshold = 512;) and change the code in the "data" manager (see below, NdT) to:
if (this.raw > threshold) {
   myLed.on();
} else {
   myLed.off();
}
Alternatively, the Johnny-Five's Sensor object may be assigned a logical threshold, such as:
myPotentiometer.booleanAt(512).on("data", function() {
  if (this.boolean) {
    myLed.on();
  } else {
    myLed.off();
  }
});
Servo Motor Control:
This is a very good example that combines a couple of chains. Set up the circuit as you did in exercise 4, and then change the read manager to assign a servo position using servo.move (the Anime value).
You can use the map function to interpolate a number from one interval to another. Fn.map (rawValue, 0, 1023, 0, 179) to synchronize the potentiometer value from 0 to 180 with the servo motor.
Run your program and see how the servo tree rotates as you rotate the potentiometer.