Turn on the engine, turn around!
Transistor and motor.
Arduino ports are great for direct control of small electrical elements such as LEDs. However, when larger items (such as a toy motor or washing machine) are implemented, an external transistor is required.
The transistor is incredibly useful. It produces a significant current using a weaker current. Three-pin transistor. For a negative type transistor (NPN), you connect the charge to the collector, and the transmitter to the ground. Then, when a small current travels from the base to the transmitter, the current travels through the transistor and your motor turns.
There are literally thousands of different types of transistors here, allowing you to accurately respond to each situation. We chose P2N2222AG, a transistor for a fairly common purpose .
Important factors in our case are that the maximum voltage (40V) and maximum current (200 milli-amps) are both strong enough for our toy motor (you can read more about this plug).
The diode 1N4001 acts as a free wheel.
COMPONENTS
- Transistor P2N2222AG (TO92). (Translator's note: I used a reference transistor BC7478K7E no problem).
- Toy engine.
- Diode (1N4001).
- 330 ohm resistance (orange-orange-brown)
- Connecting wire.
CIRCUIT DIAGRAM
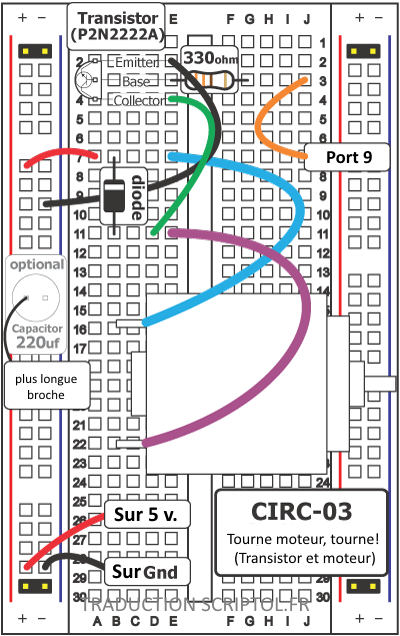
CIRCUIT INSTALLATION

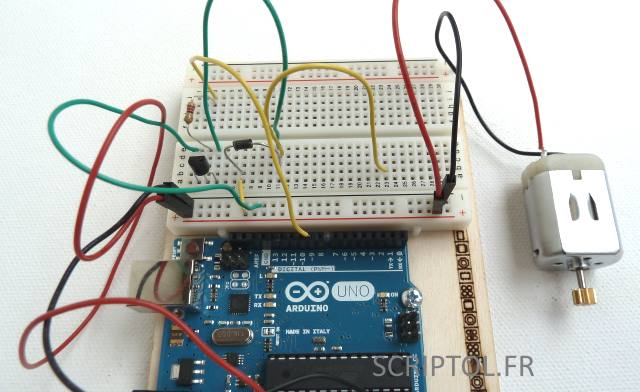
Photo of engine installation by translator
CODE
You can find this code in CIRC03-code-motor.js.
var five = require("johnny-five"), board, myMotor, led;

board = new five.Board();

board.on("ready", function() {
  myMotor = new five.Motor({ pin: 9 });

  // gestionnaire d'évènement pour démarrer et stopper

  myMotor.on("start", function( err, timestamp ) {
    console.log( "started", timestamp );

    // stoppe après 2 secondes
    board.wait(2000, function() {  myMotor.stop(); });
  });

  myMotor.on("stop", function( err, timestamp ) {
    console.log( "stopped", timestamp );
  });

  myMotor.start();
});
EMERGENCY REPAIR
The engine that doesn't turn?
If you are with your own transistor, then, of course, check the plug that the rattle is compatible with the P2N2222AG (many are turned over ).
Still unlucky
?If you brought your own engine, make sure it runs at 5 volts and doesn't require too much power. You may need to connect to an external power source.
Still not
it works?Sometimes the Arduino board is disconnected from the computer. Try disabling it and then redirecting it to a USB port.
CODE EXTENSION
Speed control
:You've had fun with the Arduino's ability to control the brightness of the LED indicator before, now we'll use the same feature to control engine speed.
Arduino does this using something called pulse width modulation (PWM or Pulse Width Modulation). This refers to Arduino's ability to operate really, really fast. Instead of directly controlling the voltage from the port of Arduino, we will quickly switch the port. In the computer world, this is from 0 to 5 volts several times per second, but in the human world we see it as voltage.
For example, if the Arduino pulses at 50%, we see light attenuated at 50% because our eyes aren't fast enough to see it go between off and on. The same feature works with transistors. Don't you believe him? Try - Specify a start method parameter for rate control (0 to 255):
myMotor.start(250);