NodeBot: First step, flashing LED
LEDs (Light Emitting Diode) are used in all kinds of cunning edits, so they are included in the experimenter's kit. We'll start with something very simple, switching one back and forth between on and off, creating a nice blinking effect.
First, take the following elements, hang the circuit mounting sheet in the prototyper using two-spindle heads, and then mount the rest.
Always make sure Arduino is disabled to add or remove a component.
Turn on arduino and run the program from the archive like this:
node CIRC01-code-led-a-strobe.js
You can interact with the LED through the REPL console, so on standby>> enter led.stop () to stop blinking. Enter control-D to exit when finished.
COMPONENTS
- 5 mm LED.
- 330 ohm resistor (orange-orange-brown).
- Connecting wire.
CIRCUIT DIAGRAM
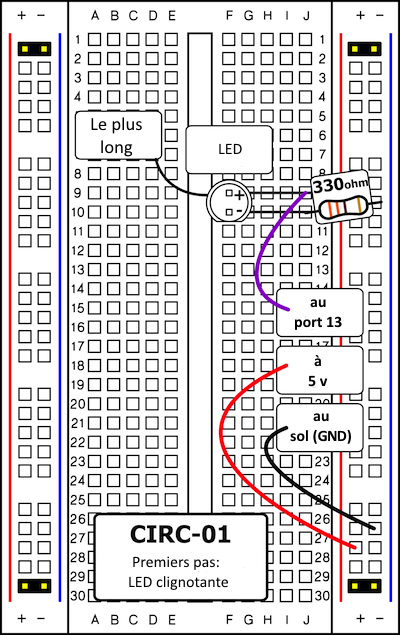
Ndt: There is no need to put a four-skirt scheme on a prototyping card, as is done in the scheme below.
In addition, the positive pole of the LED is connected to the feeder with a wire, the black black line in the diagram does not fit anything .
CIRCUIT INSTALLATION

Translator's note: The text mentions a resistance of 330 ohms, but in the image above it is 560 ohms. Instead, text follows, which also corresponds to the first diagram. I did not correct the image to stay true to the original document, the translation is highlighted.
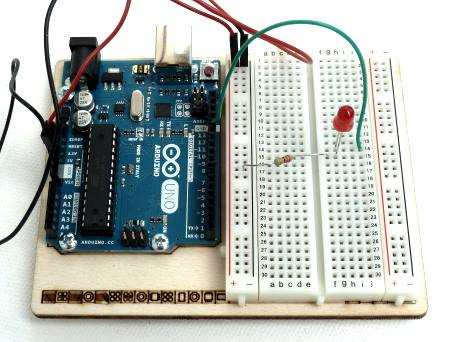
Installation of flashing LED (by translator)
Translator's note: It's a good habit to connect a card with red wire power and black ground. But in this case, the red wire is completely useless, the LED is powered by a digital port.
CODE
You can find this code in the archive under the name CIRC-01-code-led-a-strobe.js
var j5 = require("johnny-five");

var myBoard, myLed;
myBoard = new j5.Board();
myBoard.on("ready", function() {
  myLed = new j5.Led(13);
  myLed.strobe(1000);
  // rend myLED disponible en tant que "led" dans le REPL
  this.repl.inject({
      led: myLed
  });
  // essayez "on", "off", "toggle", "strobe", "stop" (arrête le clignotement)
});
EMERGENCY REPAIR
Doesn't it light up
LED?Diodes are polarized, which means they only work one way. Try removing the LED and turning it 180 degrees (do not worry, installing upside down does not cause permanent damage).
The program shows "No USB devices detected"
Make sure you connect the Arduino to your computer using a USB cable.
Still not
it works?Sometimes this happens if Johnny-Five cannot communicate with Arduino via a serial USB connection. Before starting the program, make sure you close the Arduino IDE to avoid conflicts. If the problem persists, you can tell Johnny-Five which port to use (use the port corresponding to your Arduino) like this:
var board = new j5.Board({port:'/dev/tty.usbmodemfa131'});CODE EXTENSION
Edit Port:
The LED is connected to port 13, but any Arduino port can be used. To change it, disconnect the Arduino, move the wire from port 13 to the port of your choice (from 0 to 13) (you can also use the analogue from 0 to 5). Then add a variable to the code to save the port and facilitate the change, so to change it to port 0, use:
var ledPin = "A0";
myLed = new j5.Led(ledPin);
Change blinking speed
:Not happy with default blinking speed? In the code, change the parameter for the rate control strobe method (in milliseconds) as follows:
myLed.strobe(300);Brightness control
:Along with digital control (open/closed), Arduino can control some ports similarly (brightness). (More on this in the following diagrams). To enjoy this, move the LED to port 9 and use the pulse method instead of the strobe, as we did in this program:
node CIRC01-code-led-b-pulse.js