Lordship: photoresistants
If it turns out that getting potentiometer inputs can be useful for human-driven experiments, what do we use if we want an experiment driven by the environment? We repeat exactly the same principles, but instead of a potentiometer (switching-based resistance) we use a photoresistor (brightness-based resistance).
Arduino cannot directly detect resistance (it detects voltage) also adjust the voltage divider. The exact voltage (voltage) at the receiving port can be calculated, but for our use (just detect the relative brightness) you can experiment with the values and see what works for us. A low value occurs when the sensor is well lit, and a high value occurs when it is in the dark.
COMPONENTS
- 5 mm LED.
- Resistance 330 ohms (orange-orange-brown).
- 10 kOhm resistance (brown-black-orange).
- Photoresistance.
- Connecting wire.
CIRCUIT DIAGRAM
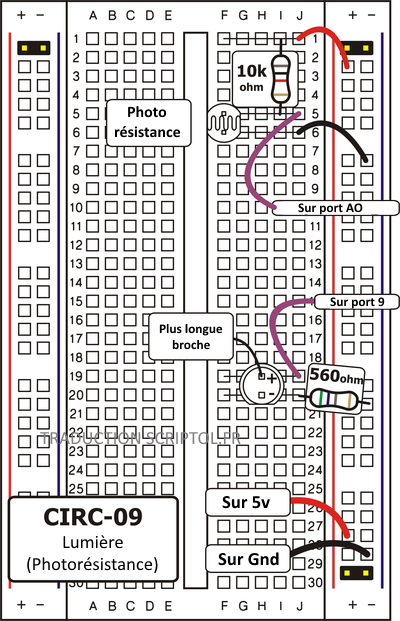
Translator's note: Photoresist editing is unclear or incorrect. Normal mounting consists of:
1) connect one of the two contacts to the 5V power supply.
2) connect the other contact with 330 ohm resistance and A0 port.
In addition, the resistance connected to the LED is 330 rather than 560 ohms.
CIRCUIT INSTALLATION

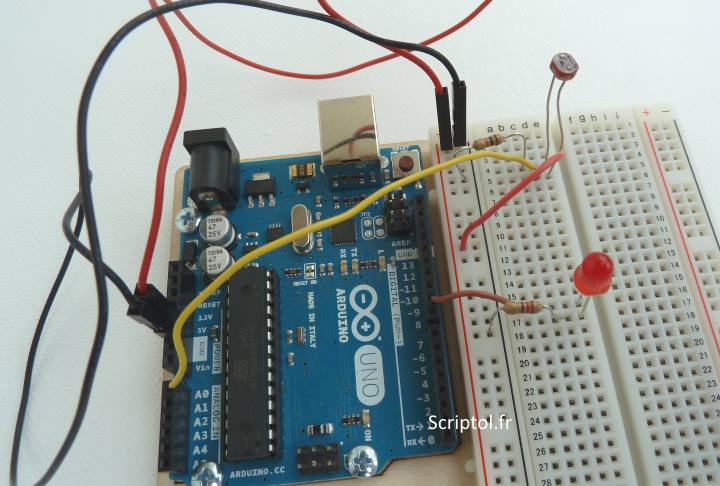
Photo of functional editing by the translator.
Note that the photoresistor tab is connected from above to a resistor and a A0 port,
and the second lowest on the diet .
CODE
You can find this code in CIRC-09-code-photoresistor.js
var five = require("johnny-five"), board, myPhotoresistor, myLed;

board = new five.Board();
board.on("ready", function() {
  myLed = new five.Led(9);
  myPhotoresistor = new five.Sensor({
    pin: "A0",
    freq: 250
  });
  myPhotoresistor.on("read", function( err, value ) {
    // l'intervalle de la luminosité de la led est entre 0 et 255
    var brightnessValue = five.Fn.constrain(five.Fn.map(value, 0, 900, 0, 255), 0, 255);
    myLed.brightness(brightnessValue);
  });
});
EMERGENCY REPAIR
LED remains black
This is a mistake we continue to make from time to time, if only we could make LEDs that work both ways! Put her away and bring her back.
Ca does not respond to light changes
Since the distance between the pins on the photoresistor is not standard, it is easy to place. Make sure she's in the right place.
Still not
it works?You may find yourself in a room that is too clear or too dark. Try turning the lights on and off to see if it helps. Or if there is a lamp near you, try it.
CODE EXTENSION
Invert Answer
:Perhaps you need the opposite answer. Don't worry, we can easily flip the answer, just add:
brightnessValue = 255 - brightnessValue;Run the program again and see the result.
Night light:
Instead of controlling the clarity of the LED in response to light, turn it on or off there based on the threshold value. Change the photoresistor data manager to:
myPhotoresistor.on("data", function( err, value ) {
  var threshold = 300;
  if (value > threshold) {
    myLed.on();
  } else {
    myLed.off();
  }
});
Or:
myPhotoresistor.booleanAt(512).on("data", function( err, value ) {
    if (this.boolean) {
        myLed.on();
    } else {
        myLed.off();
    }
});
Servo is controlled by light
Let's use our new knowledge of light detection to drive a servo motor. Connect the servo motor to port 9 (as in exercise 4).
Then take the code to control the servo motor from exercise 8 and see how it works unchanged.
Use full servo range
:Note that the servo works only on a limited part of its range. This is because with the voltage division circuit, we use the voltage on analog port 0, which is not in the range of 0 to 5 volts, but rather between two lower values (these values vary depending on your configuration). To fix it, play with the line:
thefive.Fn.constrain(five.Fn.map(value, 0, 1023, 0, 179), 0, 255);